
Just a quick glimpse into the progress of our nursery...
The color theme I chose for the nursery is a light grey & white with light pink accents.
I've been loving chevron stripes lately and I really wanted to attempt to paint them in the nursery.
I love home improvement projects and anything to do with painting. It's so fun to see a room transform!
I have to admit when I told my husband my plans for the nursery I think he was a bit skeptical but thankfully he had faith in me & helped me get to work.
First things first we painted the soon to be "chevron wall" a fresh coat of bright white
First things first we painted the soon to be "chevron wall" a fresh coat of bright white
then let it dry for a few days. Then I did a little bit of online research on how to paint chevron stripes.
Thankfully there are about a bajillion websites & blogs with "DIY Chevron Stripes" tutorials...
I followed this fab one ----> How to Paint Chevron Stripes
And also this creative one ----> Painting Multicolored Chevron Stripes
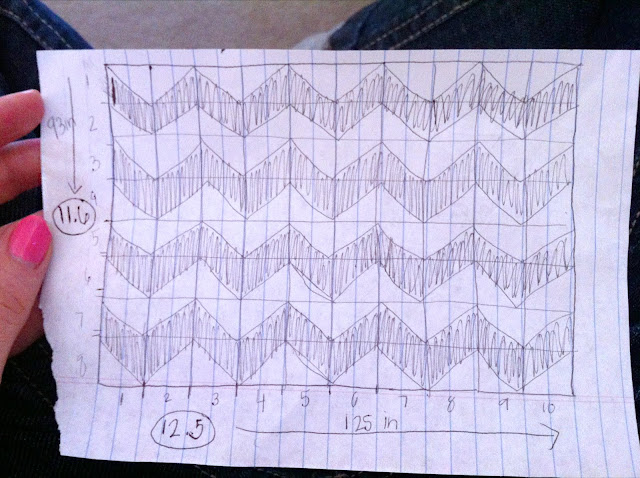
The easiest method I could find was to sketch a grid format of your wall for where you want the stripes to be. You can choose large or small stripes... I chose medium size.
(for a more detailed "how to" on making the grid - check out the blog links)
(for a more detailed "how to" on making the grid - check out the blog links)
Here's my little diagram drawing:

Then I used snap chalk to make marks on the wall, both length & width, for perfect grid lines.
Here's how the grid turned out... it's a very faint blue grid but awesome as a guideline for taping.

Then I got to work taping the wall.


Here's a close up picture of the grid lines and tape.

All finished and ready for some painting...

Before I painted the wall I took the white color and painted the edges where the grey would touch for a better seal. This helped eliminate grey seeping underneath the tape.

Then I painted two coats of grey and let it sit for about an hour.

I took the tape off before it was completely dry to help with any chipping.
Advice: pull tape slowly!

Then I took a damp towel and gently rubbed off the blue chalk.
Thankfully it came off really easily and didn't leave any residue.
Here's the finished product!


I couldn't be more excited with how the wall turned out. I've pretty much deemed it my favorite room in the house so far... Now I can't wait to get the crib in there and really start putting the room together!
Current project: sewing the baby bedding... pictures soon to come!

3 comments:
this turned out SO cute!
Thanks Chels!
Omg! I am so impressed! Looks awesome, cant wait to see the room finished!
Post a Comment